
A beautiful shower can still fail behind the tile. Water that reaches an unprotected wall, curb, or subfloor may not show itself right away, but it can lead to loose tile, mold, damaged framing, and an expensive second remodel. This waterproof shower construction guide explains the work that should happen before the finished surfaces are installed, so homeowners can make confident decisions about a bathroom renovation.
Why Waterproofing Matters More Than Tile
Tile, grout, and caulk are finish materials. They help direct water toward the drain, but they are not the waterproof system. Grout is porous, caulk eventually needs maintenance, and small openings around fixtures can allow moisture to move behind the finished wall.
A properly built shower has a continuous waterproof layer underneath or directly behind the tile assembly. That layer directs water to the drain and protects the surrounding structure. The goal is simple: water should have no path into the walls, floor, or framing.
This distinction matters when comparing remodeling proposals. Two showers may look similar when they are complete, yet one may include a carefully integrated waterproofing system and a flood test while the other relies too heavily on cement board, grout, or surface caulk. The difference is hidden at first, but it affects the long-term value of the work.
Waterproof Shower Construction Guide: The Layers That Matter
A shower is a system, not a collection of separate products. Each layer must connect correctly to the next one, especially at the floor, drain, curb, corners, niche, and plumbing penetrations.
A Stable, Properly Prepared Substrate
The work begins with a solid foundation. Walls must be framed square and plumb so tile can be installed evenly without excessive buildup of thinset. The shower floor must also be stable, whether the bathroom sits over a wood subfloor or a concrete slab common in many North Texas homes.
Any water-damaged framing, weak subflooring, or movement in the structure should be addressed before waterproofing begins. Covering a problem with new backer board does not solve it. A dependable remodel starts by correcting the conditions that could compromise the new shower.
The Right Backer Board and Waterproof Membrane
Cement board and other approved tile backer boards are often used on shower walls, but they are not automatically waterproof. Some materials resist damage from moisture, yet they can still allow water to pass through. They need an approved waterproofing approach.
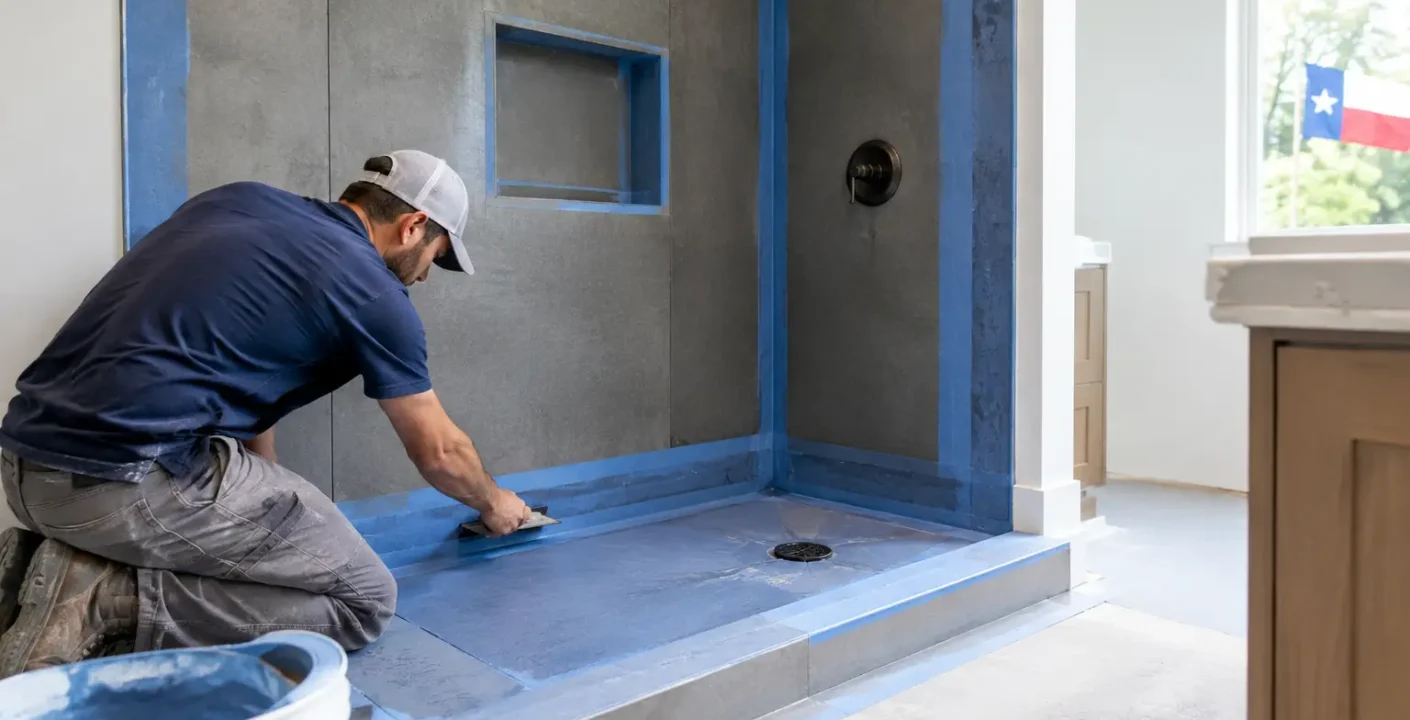
There are two common methods. A contractor may install a moisture barrier behind the backer board, or apply a waterproof membrane directly on the face of the board. Surface-applied membranes are popular because they place the waterproof layer close to the tile, helping reduce moisture absorption within the wall assembly.
The best choice depends on the shower design, materials, and manufacturer requirements. What should not change is the need for complete coverage. Seams, fasteners, corners, and transitions require the same attention as the broad wall surfaces.
A Sloped Shower Pan Connected to the Drain
Waterproofing is only effective if water moves toward the drain. The shower floor must be sloped consistently, generally at least one-quarter inch per foot, without low spots that hold water. The drain itself must be compatible with the selected waterproofing system.
For a traditional shower pan, a liner is installed beneath a mortar bed and tied into a clamping drain. For a modern surface waterproofing system, the membrane may connect directly to a bonding-flange drain. Both methods can perform well when installed correctly. Problems arise when components from different systems are combined without a tested, manufacturer-approved method.
Linear drains can create a clean, contemporary look and may allow large-format floor tile in certain designs. However, they demand precise floor slope and careful waterproofing at the drain flange. A center drain is often simpler and more forgiving, particularly in a smaller shower. Design preference matters, but drainage performance comes first.
Protected Curbs, Benches, and Niches
The curb is one of the most common weak points in a shower. It has fasteners, framing, corners, and frequent water exposure. Puncturing a traditional pan liner on the inside or top of the curb can create a direct path for water into the framing. The curb must be wrapped and waterproofed according to the selected system, then sloped slightly inward so water returns to the shower.
Built-in benches and recessed niches need equal care. A niche should be fully waterproofed, including its corners and fastener locations, with a slight slope on the bottom shelf. Without that slope, water can stand on the shelf and work into grout joints over time. A bench should be built as part of the waterproof envelope, not treated as an afterthought.
Details That Separate Reliable Work From Risky Work
Waterproofing failures often occur at small transitions rather than in the middle of a wall. The joint where the wall meets the shower pan, the opening around the mixing valve, and the corners around a niche all require compatible sealant, fabric reinforcement, or prefabricated corner components when the system calls for them.
Pipe penetrations also need attention. Shower valves, body sprays, and shower arms create holes in the wall assembly. These should be properly sealed so incidental moisture cannot reach the cavity behind the wall. Trim plates are not a substitute for waterproofing.
Glass installation deserves planning as well. Heavy glass panels may require blocking in the walls before the waterproofing and tile work begin. Drilling through a completed waterproofed wall can create risk, so the contractor should coordinate the shower glass layout early in the process.
Why a Flood Test Is Worth Requesting
A flood test is one of the clearest signs that waterproofing is being treated seriously. Before tile is installed, the drain is plugged and the shower pan is filled with water to check for leaks. The water level is monitored over a specified period, often 24 hours when conditions allow.
This test gives the contractor an opportunity to find a problem while the waterproofing is still accessible. It is far easier to repair a seam or drain connection before tile, grout, and fixtures are in place.
A flood test does not replace good installation practices, and local requirements can vary. Still, homeowners should ask whether one is planned, how it will be documented, and whether any required inspections will occur before tile installation. Clear answers usually reflect a clear process.
Common Shortcuts Homeowners Should Avoid
The most expensive shower problems usually begin with work that seems faster or less costly upfront. One shortcut is treating grout as a waterproof barrier. Another is installing wall tile directly over standard drywall in a wet shower area. Drywall may be appropriate outside wet zones in some bathroom designs, but it is not the right backing for a conventional tiled shower.
A third concern is skipping the slope below or within the shower pan assembly. If water cannot reach the drain, it can remain trapped beneath the tile. This may contribute to odor, discoloration, or premature material failure.
Homeowners should also be cautious when a proposal is vague about waterproofing. A detailed scope does not need to overwhelm you with technical language, but it should identify the shower system, wall preparation, pan construction, drain approach, and testing plan. If those details are missing, ask before work starts rather than after tile has been installed.
Questions to Ask Before Your Shower Remodel Begins
Ask your contractor which waterproofing system will be used and whether all components are designed to work together. Confirm how the shower pan will be sloped, how the drain connects to the membrane, and how the curb, bench, and niche will be protected.
It is also reasonable to ask when you can see the waterproofed shower before tile goes up. Progress photos are helpful, particularly when you are not living in the home during construction. For homeowners in Sachse and throughout the Dallas-Fort Worth area, choosing an experienced remodeling team can reduce the stress of managing these details yourself.
A shower should feel like a finished retreat, not a future repair waiting behind new tile. When the construction work underneath is planned carefully, tested before finishes are installed, and communicated clearly, you can enjoy the design knowing the parts you cannot see were given the same level of care.