
A beautiful new shower can hide a costly problem for years. Tile, grout, and caulk are finish materials, not the system that keeps water out of the framing behind them. In a North Texas bathroom remodel, choosing the right shower waterproofing methods is one of the decisions that determines whether the space stays dependable or develops soft walls, loose tile, mildew odors, and leaks below the shower line.
The right approach depends on the shower design, the condition of the existing structure, the selected tile, and how the drain and pan will be built. Homeowners do not need to become waterproofing experts, but they should understand what their contractor is installing and why.
Why Shower Waterproofing Deserves Close Attention
Showers are exposed to water every day, often in places that are hard to inspect once construction is complete. Moisture can pass through grout joints, small cracks in caulk, and natural openings around plumbing fixtures. If there is no continuous waterproof layer behind or beneath the tile, water can eventually reach drywall, wood framing, insulation, or the subfloor.
This is especially relevant in older Dallas-Fort Worth homes, where a bathroom renovation may reveal past repairs, deteriorated shower pans, or framing affected by a slow leak. Replacing tile without correcting the waterproofing assembly can leave the real issue in place.
A properly waterproofed shower directs water back toward the drain. It also creates a reliable barrier at vulnerable transitions: wall corners, bench seats, niches, curbs, plumbing penetrations, and the connection between walls and the shower floor. The details matter as much as the membrane itself.
Common Shower Waterproofing Methods
Several proven systems are used in quality bathroom remodeling. A qualified contractor may favor one approach based on the shower layout and materials, but every method must be installed as a complete, compatible system.
Traditional Mortar Bed and Liner Systems
A traditional shower pan uses a flexible PVC or CPE liner beneath a sloped mortar bed. The liner is installed over a pre-slope that guides water toward a clamping drain. Wall moisture protection is then handled separately, typically with a moisture barrier behind cement backer board.
This method has been used successfully for decades and can be a sound choice when installed correctly. Its main advantage is a long track record and broad contractor familiarity. The trade-off is that the installation has multiple layers and critical steps, including a proper pre-slope, protected drain weep holes, carefully formed corners, and correct liner height at the curb.
Traditional systems can fail when a liner is laid flat on the subfloor, punctured at the curb, or installed without proper drainage beneath the mortar bed. Those errors may not be visible until long after the project is finished.
Liquid-Applied Waterproofing Membranes
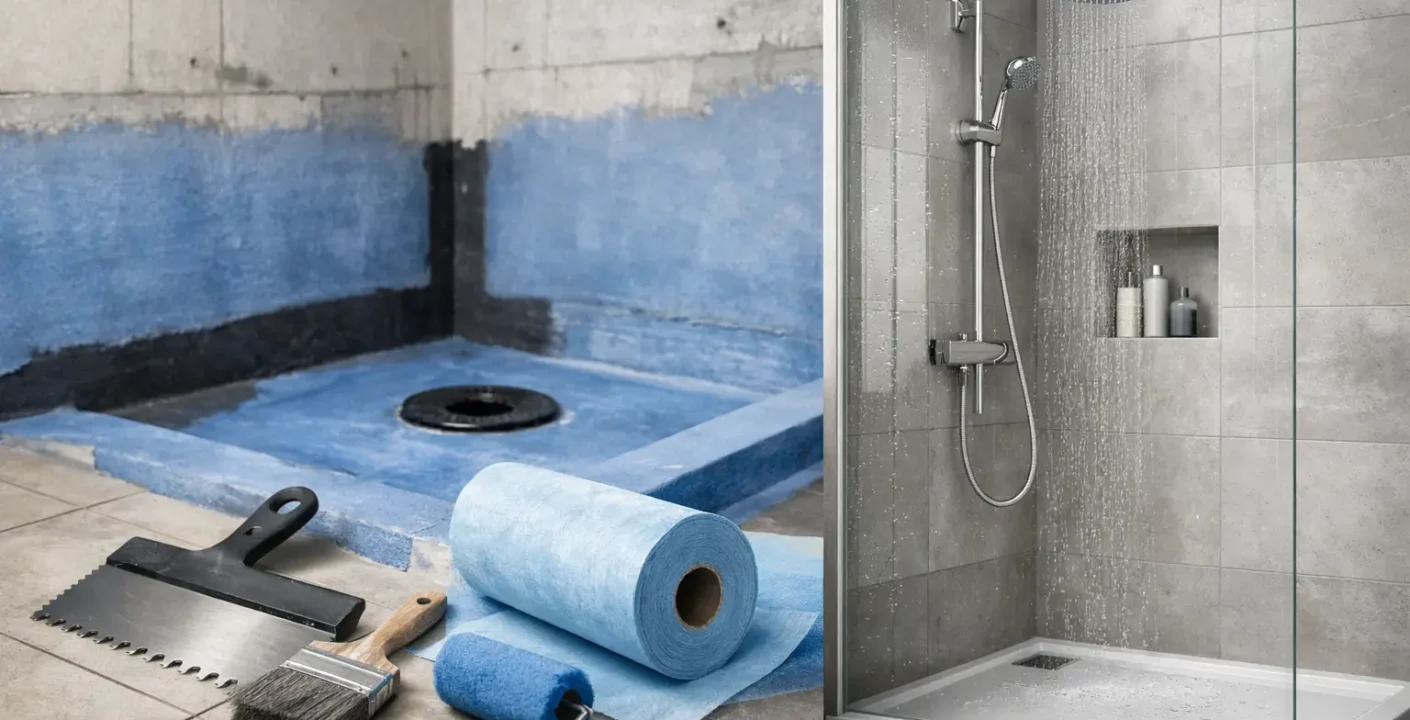
Liquid-applied membranes are rolled, brushed, or troweled onto cement board, fiber-cement board, approved drywall in certain systems, or a prepared shower floor. Once cured, the material creates a continuous waterproof layer directly behind the tile.
This approach works well for shower walls, niches, benches, and other shapes that would be difficult to cover with a sheet membrane. It can also be integrated with some shower pan systems. Because it is applied as a liquid, it can form a highly continuous coating around corners and penetrations.
The key consideration is thickness. A membrane that looks evenly coated may still be too thin to perform as intended. Manufacturers specify application rates, dry-film thickness, and the number of coats required. Installers should also reinforce changes of plane and seams according to the system requirements. A rushed application is one of the most common risks with liquid waterproofing.
Sheet Membrane Waterproofing
Sheet membranes are manufactured waterproof sheets bonded to the wallboard or mortar with thinset or a system-specific adhesive. Seams, corners, and transitions are overlapped or sealed with matching bands and accessories. The waterproof layer sits immediately behind the tile, which helps limit how much water can enter the wall assembly.
For many custom showers, sheet membranes offer excellent reliability because the material arrives at a known thickness. They are particularly useful with prefabricated shower trays, linear drains, curbless showers, and detailed custom layouts. When seams are properly sealed, the assembly can be water-tested before tile is installed.
The trade-off is precision. Sheet systems require careful measuring, smooth substrate preparation, and complete seam coverage. A small missed overlap or poorly bonded seam can compromise the assembly. For this reason, the installer should follow one manufacturer’s approved components rather than mixing products that were not designed to work together.
Foam Backer Boards and Shower Panels
Waterproof foam boards combine a lightweight tile backer with a waterproof core and coated surface. The boards are fastened to framing, and joints, screws, corners, and penetrations are sealed with the manufacturer’s approved materials. Many systems include matching preformed niches, benches, curbs, trays, and drain components.
Foam panels can make sense when speed, consistent flatness, and integrated components are priorities. They can be especially practical in a full bathroom renovation where walls are opened to the studs. They are not automatically waterproof at every joint, however. The board system is only as dependable as the treatment of its seams and fasteners.
The Best Method Depends on the Shower Design
There is no single waterproofing system that is best for every bathroom. A straightforward alcove shower may be well served by a traditional pan with carefully installed wall waterproofing. A large walk-in shower with a bench, niche, and oversized format tile may benefit from a fully bonded sheet membrane or integrated foam-board system.
Curbless showers require even more planning. The floor must be recessed or otherwise designed to create the correct slope while maintaining a smooth transition into the bathroom. The waterproofing must extend beyond the wet area where needed, and the drain assembly must be compatible with the selected membrane. These showers can be attractive and accessible, but they leave less room for installation shortcuts.
Tile selection also affects the work. Small mosaic tile is often a practical choice for shower floors because the many grout joints provide traction and conform to a sloped surface. Large-format tile can create a clean look, but it may require an envelope cut, a linear drain, or a carefully designed floor slope to avoid standing water.
Details That Separate a Dependable Shower From a Risky One
When evaluating shower waterproofing methods, ask how the full system handles the details, not just the main wall surface. A dependable installation should address:
- A sloped shower floor that directs water to the drain without low spots
- Waterproofed wall corners, wall-to-floor transitions, niches, benches, and curbs
- Properly sealed pipe openings, valve penetrations, and showerhead penetrations
- A drain designed to connect correctly with the selected waterproofing system
- Approved backer materials rather than standard drywall in areas not supported by the system
- A flood test before tile installation when the shower pan is complete
A flood test is one of the clearest signs of careful process. The drain is temporarily sealed, the shower pan is filled with water, and the water level is monitored for a set period. This helps confirm the pan and drain connection hold water before the tile covers the work. It cannot replace skilled installation, but it is an important quality-control step.
Avoid These Common Waterproofing Mistakes
The most damaging shower failures usually begin with shortcuts that seemed minor at the time. Treating grout as the waterproof barrier is one. Grout is porous, and even sealed grout requires regular maintenance. Caulk is necessary at changes of plane, but it is not a substitute for a membrane behind the tile.
Another mistake is combining incompatible materials. A drain, membrane, adhesive, and sealant should be approved for use together. Using leftover products from different systems may appear economical, but it can create uncertainty at the exact points where water is most likely to find a path.
Homeowners should also be cautious about covering existing shower walls or floors without investigating signs of damage. Cracked tile, persistent mildew, a spongy floor near the shower, or staining on an adjacent wall may indicate that water has already moved beyond the tile surface. A proper remodel identifies and repairs the source before rebuilding.
Questions to Ask Before Your Shower Is Tiled
Clear communication early in the project helps prevent surprises later. Ask your contractor which waterproofing system will be used, where the waterproof layer will be located, and how the shower pan connects to the drain. Ask whether the shower will be flood-tested and how benches, niches, and curbs will be waterproofed.
It is also reasonable to ask for progress photos before tile installation. Waterproofing is hidden once the finish work begins, so documentation gives homeowners confidence that the critical stages were completed. Experienced remodelers should be able to explain the plan in plain language without treating these questions as an inconvenience.
For homeowners in Sachse and the greater Dallas-Fort Worth area, Oak Custom Remodeling approaches bathroom remodeling with the understanding that the work behind the tile is every bit as important as the finished design. A shower should feel like an upgrade from day one and remain one for years after the final grout cure.
Before choosing tile colors or a new shower fixture, make sure the waterproofing plan is clear. The best-looking shower is only as valuable as the protection built behind it.